Instructions how to paint exterior walls in 6 easy steps. Download the pdf for a step by step guide of your project.
Step 1:
Remove as many items around the house as you can (planters, mailboxes, shutters, house numbers, hoses, outdoor furniture, light fixtures, etc.). Make sure you protect any plants or items that can’t be removed by covering them with drop cloths. You can also put drop cloths under the areas you want to paint.
Step 2:
It is essential to understand the importance of proper surface preparation before you getting started. Because paint does not stick to untreated walls, walls must be prepared to accept paint. Omit this and the finish will chip and flake away, over time. First thoroughly clean the surface, and apply a coat of wall sealer/primer, before attempting to coat walls with a fresh coat of paint. First start by cleaning dirt, dust and loose old paint from the walls, with a pressure washer or garden hose. The remaining dirt and grease can be removed with specially formulated All Clean© from Kooyman. Next remove old paint layers with specially formulated paint removers or strippers.
After the walls are clean we advise using a wall sealer/primer. A wall sealer/primer will cover marks, stains and repair work. A wall sealer also improves the adhesion of the new coat of paint and thereby the end result of your paint job.
Chalking or powdery surfaces can best be treated with Aquafix© before painting. This will improve the adhesion of the new coat of paint. Aquafix© can be found near the wallsealer/primers at Kooyman.
Step 3:
Apply painter’s tape to any parts of the walls you don’t want to paint. Spread a drop cloth on the surface below the walls.
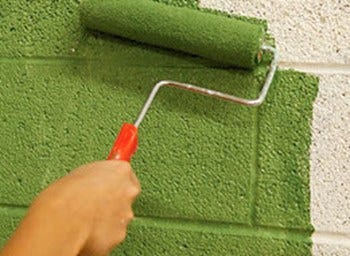
Step 4:
Painting with a brush. To load your brush, dip the first third of the bristles into the paint and tap it lightly against the inside of the can. Try not to drag the bristles across the edge of the can, as this will remove too much paint. When you apply paint, use long, smooth strokes with your brush. Remember that for a well-spread, even coat, you should brush oil-based house paints back and forth several times. Latex paints, however, require less brushing. Because they can dry quite quickly, excessive brushing can cut deep brush marks into the paint film. When you use latex paints, apply the paint generously with one or two back strokes and then let it dry.
Painting with a roller. Applying paint with a roller works well with all surfaces like masonry and stucco. To use a paint roller, dip your roller in the paint tray and roll it back and forth to remove any excess paint. If it drips when you pick it up, it is overloaded. Use long, even strokes, and roll in different directions to coat the entire surface. Finish painting with strokes in one direction. Paint the walls in “W” strokes with the roller. Then apply the paint in straight lines to cover the space evenly. If the ceiling has a different color then make sure you use painter’s tape.
Step 5:
Finish the trim. The trim should be the last area you paint. Begin by coating your window sash and door paneling first, and then paint the window frames and door trim. If paint gets on the window's putty line, it will serve to protect the puttied surface from water. To create a clean edge, scrape off any excess paint with a razor blade.
Step 6:
Allow the paint to dry very carefully, and then apply an additional coat if necessary.